"The grass withers, the flower fades, But the word of our God stands forever." Isaiah 40:8

Saturday, 31 January 2015

Tiddly Inks - Spring Bling Wryn

I made this card for a friend of mine who received some fantastic news a few weeks ago! I pray things continue to go well! Here is the card:

Elizabeth Whisson, Copics, Tiddly Inks, Spring Bling Wryn, Our Daily Bread Designs, ODBD, Mini Tags, Mini Tag Sentiments, Green Tara, Live and Love Crafts, distress, Copic sketch, frantage, chunky white,

I've printed the digital stamp, Spring Bling Wryn by Tiddly Inks, onto X-Press It blending card and coloured with Copic markers (following along with one of the videos from this site). I've been colouring with Copics for a few years but it's always good to keep learning and see how other people colour too :-)

I've then cut it around in a square, distressed the edges then inked with Distress Ink Crushed Olive. I've added some Frantage chunky white around the edges. The other layers are also distressed around the edges and have been inked with Distress Ink. The DP I've used is from Bo Bunny "Family Is Collection", Studio Calico "Here + There Collection" and Scrapworks "Love in Bloom - Stripe". The cardstock is Bazzill textured.

I've added some Green Tara lace and some flowers from Live and Love Crafts. The little tags are  diecut using ODBD Mini Tags Dies (the white one and the pink heart) and has been stamped with Our Daily Bread Designs Mini Tag Sentiments. I've then added some twine to finish it off.

Thanks for looking!

Friday, 30 January 2015

Winter Pick Me Up

Well it is definitely NOT winter here in Australia (forecast of 36 degrees celsius here today (96.8 Fahrenheit) - although I'm not complaining - I can handle 36, but 40 is getting a bit hot! Let's hope there isn't too many of those!

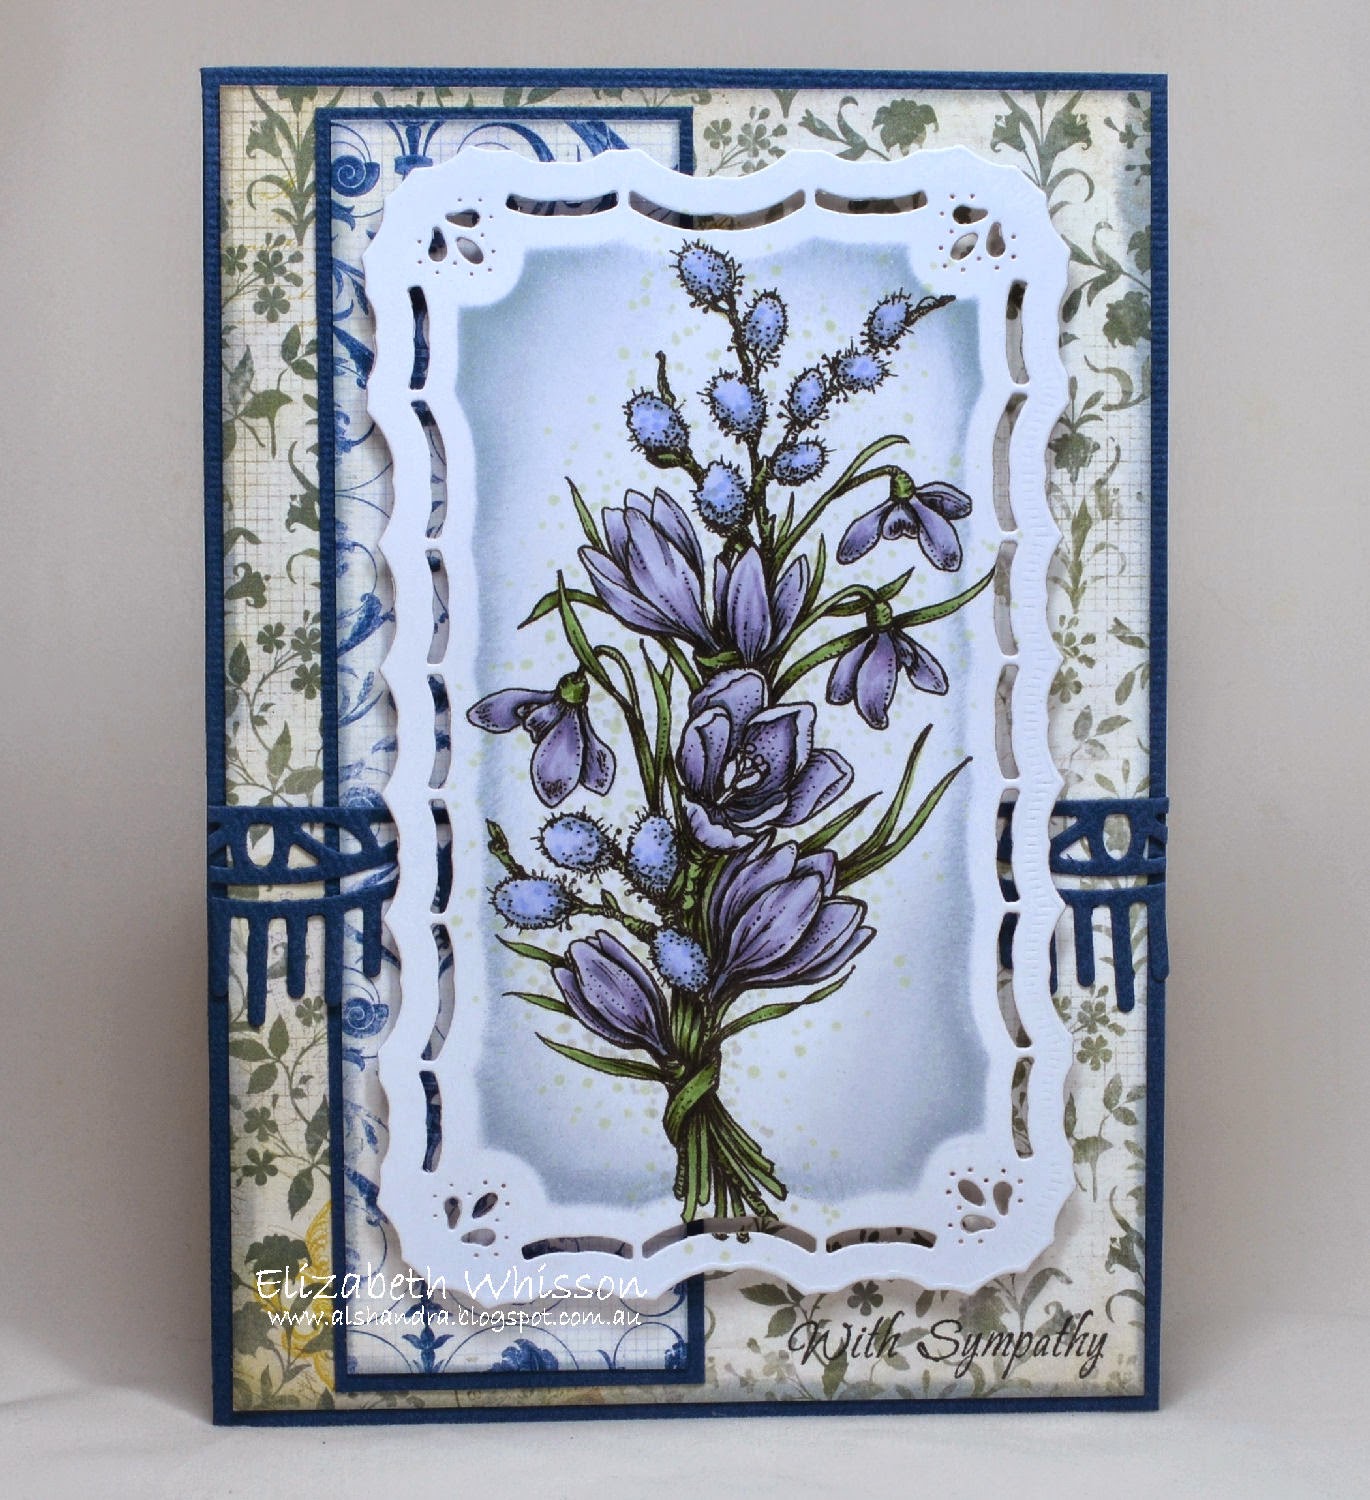
I saw this gorgeous digital stamp on Power Poppy the other day called Winter Pick Me Up and had to add it to my collection. Here is the card I made:

Power Poppy, Powerpoppy, Elizabeth Whisson, handmade card, Copics, Copic sketch, ODBD Beautiful Borders, Our Daily Bread Designs, All Occasion Sentiments, With Sympathy, Distress Ink Weathered Wood

I printed Winter Pick Me Up by Power Poppy onto X-Press It blending card and coloured with Copic markers.

Copic Markers Used
Blue/Violet Flowers/Buds: B60, B63, N3, N6
Purple Flowers: V20, V22, V25, V28, N6
Greenery: G82, G94, G99
Background: Dots of G40 and W2

I've then diecut the image using Spellbinders Nestabilities Majestic Elements "Resplendent Rectangles". I've inked it with Distress Ink Weathered Wood while still in the die. 

The DP I've used is Bo Bunny Rose Cafe and I've used Bazzill textured cardstock as my base. I've also used the Bazzill to diecut the ODBD Beautiful Borders die

The With Sympathy stamp is from Our Daily Bread Designs All Occasion Sentiments. It's actually just the bottom part of one of the stamps - I just chose to ink only the words "With Sympathy".

I am adding my card to Power Poppy Peep of the Week.

Thanks for looking!

Tuesday, 27 January 2015

ODBDSLC224 - Anything goes with ODBD


Elizabeth Whisson, Our Daily Bread Designs, ODBD, cupcake, handmade card, Copics, chocolate, Mini Tags Sentiments, Matting Circles dies, Circle Ornament dies, Baking Gift Tags

I've taken the cute little cupcake stamp from Our Daily Bread Designs Baking Gift Tags and stamped it randomly over the light brown card using Ranger Archival Ink - Coffee. I've stamped the large cupcake using Our Daily Bread Designs Cupcake Single using Memento Tuxedo black onto X-Press It blending card and coloured with Copic markers.

Copic Colours Used
Icing: E40, 42, 44, 47, 49
Cupcake base: E50, 53, 55, 57, 59
Ground: E3, 42, 40
And I used an AtYou Spica pen (chocolate) for the sprinkles on the cupcake.

I've used ODBD Matting Circles dies and ODBD Circle Ornament dies to cut out the cupcake and the dark brown matted layer.

The little tag and heart are both diecut using ODBD Mini Tags dies. The Happy Birthday sentiment is from Our Daily Bread Designs Mini Tag Sentiments.

Most layers are inked wtih Distress Ink Walnut Stain and I've added some Pinecone coloured floss and some half-pearls to finish off the card.

I hope you like my chocolate coloured card!

For more inspiration for this challenge please visit my talented design team sisters:
 
To see all the projects created for ODBDSLC224 or to join the challenge click here. You have until 8 pm Sunday, 1 February 2015 EDT to join us (or 9 am Monday , 2 February 2015 AWST). By participating in the challenge, you have a chance to win a $15 ODBD Gift Certificate that can be used towards the purchase of stamps in the “stamps column” in the ODBD store; or to be spotlighted on the ODBD Blog at our next challenge! The random prize winner will be posted on our next challenge post.
 
Thanks for looking!

Tuesday, 20 January 2015

ODBDSLC223 - Inspiration


Here is my card:
Elizabeth Whisson, Our Daily Bread Designs, Blushing Rose Paper Collection, ODBD Asters and Leaves Dies, ODBD Beautiful Borders Dies, Spellbinders dies, pearls, Birthday blessings, Just a Note, handmade card, Copics


Here is the inspiration photo:
I saw the cup of tea on the table and the piano in the image and thought, that matches perfectly with the sentiment from Our Daily Bread Designs' new stamp set - Just a Note. And then the image from ODBD Birthday Blessings came to mind which I think matches perfectly with the sentiment and image. 

For my card I've stamped the image from Our Daily Bread Designs Birthday Blessings onto X-Press It blending card and coloured with Copics.

Copic colours used:
Flowers: R11, R12, R14
Leaves: YG61, YG63, YG67, G28
Doily: E50, E51, E53
Cup/Vase and saucer and shadow: N1, N3 and colourless blender

I've diecut the image with a Spellbinders die. I've then diecut pink flowers using ODBD Asters and Leaves Dies and a pink piece using ODBD Beautiful Borders die from ODBD Blushing Rose Paper Collection. The green DP is also from ODBD Blushing Rose Paper collection. I've diecut the leaves using ODBD Asters and Leaves Dies. The sentiment is from the new stamp set (January release) Our Daily Bread Designs Just a Note. I've then added some half-pearls to finish off the card.

For more inspiration for this challenge please visit my talented design team sisters:

To see all the projects created for ODBDSLC222 or to join the challenge click here. You have until 8 pm Sunday, 18 January 2015 EDT to join us (or 9 am Monday , 19 January 2015 AWST). By participating in the challenge, you have a chance to win a $15 ODBD Gift Certificate that can be used towards the purchase of stamps in the “stamps column” in the ODBD store; or to be spotlighted on the ODBD Blog at our next challenge! The random prize winner will be posted on our next challenge post.


I love the sentiment that I've used on my card. I usually have a cup of tea while I'm making cards and I also usually have some sort of music playing or I'm listening to a sermon. I love singing along as I'm crafting. Lately I've been listening to Casting Crowns (Thrive and Come to the Well albums), Chris Tomlin (Love Ran Red) and Steve Grace (Heritage). I espcially love the words of Chris Tomlin's song At the Cross. The first two verses and chorus say:


"There's a place where mercy reigns and never dies,
There's a place where streams of grace flow deep and wide.
Where all the love I've ever found,
Comes like a flood,
Comes flowing down.

[Chorus:]
At the cross
At the cross
I surrender my life.
I'm in awe of You
I'm in awe of You
Where Your love ran red
and my sin washed white.
I owe all to You
I owe all to You Jesus.

There's a place where sin and shame are powerless.
Where my heart has peace with God and forgiveness.
Where all the love I've ever found.
Comes like a flood,
Comes flowing down."

What wonderful words to describe the love that God has for us.


Thanks for looking!

Tuesday, 13 January 2015

ODBDSLC222 - Colour

The challenge this week, ODBDSLC222, at Our Daily Bread Designs is a colour challenge. Here is my card:

Elizabeth Whisson, Chickadee, Our Daily Bread Designs, bazzill textured, handmade card, twine, colour challenge, Copics, You will find refuge, Psalm 27:6, elegant ovals, lavender, faithful fish pattern, debossing, mini tags, just a note, I will sing and make music to the Lord


And this is the colour pallette: 

I've made my card by first stamping the Chickadee image, from Our Daily Bread Desings You Will Find Refuge stamp set, twice onto X-Press It blending card. I've diecut one with ODBD Elegant Ovals dies and the other with ODBD Chickadee die. Before removing from the Elegant Ovals die I sponged the diecut with Distress Ink Shaded Lilac. The single chickadee I coloured with my Copic markers. I've attached the Copic coloured single Chickadee ontop of the Elegant Ovals chickadee with foam tape. 

Copic colours used
Branch: E70, E42, E55, E44
Berries: BV00, BV04, BV08
Bird - feathers: BV000, E51, E55, E57, E59
Bird - beak and feet: E55, E57

I've used three different Bazzill textured card colours - pansy (dark purple), heather (light purple) and Chiffon (cream). My background heather card has been diecut and debossed using the ODBD Faithful Fish Pattern die

For my bottom panel I have stamped one of the sentiments from Our Daily Bread Designs Just a Note in black ink on the cream card. I've then stamped the same image from Our Daily Bread Designs Lavender set numerous times to create the bouquet of lavender. I stamped this using Distress Ink Shaded Lilac. 

Lastly I've wrapped some twine around the panels and added a little cream heart (diecut using the ODBD Mini Tags dies).

For more inspiration for this challenge please visit my talented design team sisters:

To see all the projects created for ODBDSLC222 or to join the challenge click here. You have until 8 pm Sunday, 18 January 2015 EDT to join us (or 9 am Monday , 19 January 2015 AWST). By participating in the challenge, you have a chance to win a $15 ODBD Gift Certificate that can be used towards the purchase of stamps in the “stamps column” in the ODBD store; or to be spotlighted on the ODBD Blog at our next challenge! The random prize winner will be posted on our next challenge post.
Thanks for looking!

Tuesday, 6 January 2015

ODBDSLC221 - Sketch

Welcome to a whole new year of challenges with Our Daily Bread Designs! I'm so excited to continue to be on the ODBD Challenge Team; but sad that two of our very talented designers had to leave due to personal reasons. But excited because we have a new talented lady joining our team - welcome Gracie!

Our challenges have gone back to weekly and to kick off the new year we have a sketch challenge, ODBDSLC221.

When I first saw the ODBD January release and this sketch I immediately thought of a piano! I've been playing the piano for roughly 28 years and while I don't get to play it as often as I'd like to these days I still really enjoy playing.

Here is my card:

 And here is the sketch:

You can see that I've kind of squashed the sketch down to make it shorter and stretched it out longways and I've replaced the bow with a tag.

I've stamped the treble clef (Our Daily Bread Designs Just a Note) in black ink onto some heavyweight white card. I've then diecut this with ODBD Matting Circles dies. I've made a doily diecutting ODBD Doily die from some black card to go behind the treble clef.

For my piano keys I've first diecut a piece of white card and a piece of black card using ODBD Faithful Fish Pattern die. This die is gorgeous and produces little debossed fish with cut-out circles and some debossed circles around the outside (not pictured on card) with tiny little pierced diamonds.

After I had diecut my black and white card I cut each piece to size to make the white and black keys of the piano. I attached my piano keys to a piece of heavyweight white card and then attached this to my card base (black Bazzill textured cardstock).

I've diecut the ODBD Crocheted Border die from black cardstock and attached a little tag with some white floss. The tag is one of the dies from ODBD Mini Tags dies and stamped with a sentiment from Our Daily Bread Designs Mini Tags Sentiments.


For more inspiration for this challenge please visit my talented design team sisters:

To see all the projects created for ODBDSLC221 or to join the challenge click here. You have until 8 pm Sunday, 11 January 2015 EDT to join us (or 9 am Monday , 12 January 2015 AWST). By participating in the challenge, you have a chance to win a $15 ODBD Gift Certificate that can be used towards the purchase of stamps in the “stamps column” in the ODBD store; or to be spotlighted on the ODBD Blog at our next challenge! The random prize winner will be posted on our next challenge post.


I've been part of church music teams (piano, flute and as a music coordinator) in various churches over the last 15 years or so and am very grateful that God has given me these gifts. I love playing music for the Lord and love listening to the congregation sing to Him. While playing and singing in tune sounds beautiful to our ears, I love how God looks upon our hearts and sees the attitude that we come with when we play and sing to Him.

Thanks for looking!

Thursday, 1 January 2015

Mini Album

I had the idea to make a mini album for my parents as a Christmas present since January 2014 but only got around to making it a couple of days before Christmas! It's the second mini album that I have made (you can see my first one (mini accordion album) here) but the first of this type (using album rings).

There are some photos below of the album but if you are interested in making one yourself you can download and print out detailed instructions (with measurements included) here.

Here is what the front cover looked like finished:
Elizabeth Whisson, mini album, album rings

I could have added a lot more to the front cover (i.e. flowers, diecuts etc.) but I like it with just with the photo (and I was running out of time!)

The album is 5" (12.7 cm) square plus the album rings on the side. On the inside I have 7 pockets, each with inserts, and 2 vellum pages (because I couldn't leave out any photos!) Each pocket is decorated front and back and each insert is also decorated front and back. The vellum pages just have a photo on one side with decorations on the back. I added some tabs to each of the inserts so they can be pulled out easily.

Here are some pictures of the album in progress:
 Unfinished front cover: I've used a range of ribbons including Crafter's Choice and Two Green Zebras). The DP that I've used on the outside and inside of the front and back covers is from Bo Bunny - Rose Cafe.

 This is the inside front cover and you can see one of the inserts with a tab inside the first pocket.


 This is the inside of the back cover and the last pocket.

 An insert page part-way pulled out of the pocket.

Two inserts - these are the two styles of tabs that I used.


Back cover

And here are some photos of the finished album:


I did all my journaling in my mini album with either a Uni-ball Signo white gel pen, distress markers or Copic multiliners.

Thanks for looking
and if you want to make one yourself - you can download the instructions here.
Related Posts Plugin for WordPress, Blogger...