A friend of ours is not well at the moment and it was actually my husband's idea to send her a card (don't know why I didn't think of it first!) so I made this one for her ("Get well soon" is stamped on the inside).
I am entering this card in
1. Anything Goes Challenge Blog - Challenge #95 Buttons, Pearls and Lace challenge;
2. Word Art Wednesday - Challenge #86 - Anything Goes; and
3. Simon Says Stamp Challenge - Simon Says... Anything Goes.
My 4 year old daughter also wanted to make a card... so she made this:
She cut the paper out herself and coloured in the images (I actually stamped them but she could've done this herself - just the way it worked out) and she turned the Big Shot handle all by herself and glued everything on :-) (I was such a proud Mummy :-) )
For my card:
Copics: R00, R11, R22, BV000, BV04, YG21, YG23, YG25, G24, G46, G28, B0000, Y13, Y38 and 0.
Stamps: Flourishes "Winter Blossoms" and Our Daily Bread Designs "Scripture Collection 9"
Ink: Memento "Tuxedo Black"
Cardstock: DCWV Textured Brights, KaiserCraft "Precious Moments" and X-Press It blending card
Dies: Spellbinders Nestabilities "Lacey Ovals", Spellbinders Shapeabilities "Bitty Blossoms" and "Spellbinders Shapeabilities "Foliage Two"
Other: Beutron Craft Button, Boutique Decorative ribbon, Creativ Lace ribbon, Papercraft pearls, Tim Holtz Distress Markers "Tattered Rose", "Milled Lavender", "Shabby Shutters" and "Bundled Sage", Inkssentials Glossy Accents (to stick embellishments on), double sided tape and X-Press It high tack foam mounting tape.
"The grass withers, the flower fades, But the word of our God stands forever." Isaiah 40:8
Thursday, 27 June 2013
Wednesday, 26 June 2013
Lil Monster
I was ordering some more stamps from AnnaBelle Stamps and was delighted to find that they had a die to go with the Lil Monster's Birthday stamp (not sure how I missed it before). So I just had to try out my die when it arrived :-)
I have also been reading about Copic colouring with the "no lines" technique (great tutorial on the Lime Tart site) and decided to give that a go too (although I did discover that I didn't have any light coloured inks that really "worked", so I will be investing in one soon)! This is my card:
I am entering this card in the AnnaBelle Stamps AC165 challenge where you had use these colours:
Copics: BG000, BG01, BG02, YR12, YR14, YR16, YR15, E71, E74, E77, E41, E0000, W00 and W3.
Stamps: AnnaBelle Stamps Lil Monster's Birthday
Ink: Versa Color #181 Vanilla and #171 Pinecone
Cardstock: Quill XL Multiboard, X-Press It blending card, DCWV The Blossom Song Stack and Crafter's Choice Primary Basics.
Dies: AnnaBelle Stamps Lil Monster's Birthday
Other: AnnaBelle Stamps sprinkles #21 Turquoise 3 mm, Ranger Superfine embossing powder, distressing tool, Distress Marker - Tumbled Glass, cut 'n' dry foam, Glossy accents (to glue the sprinkles on), X-Press It high tack foam mounting tape, Stickles "Stardust" and "Waterfall" glitter glue, Copic multiliner 0.3 mm black and Boutique double sided satin polyster ribbon (coloured with YR15, E74 and BG01 copic makers).
Monday, 24 June 2013
Baby Shower
Would like to share another card that I made for a friend's baby shower. This is my first "step" card.
The card doesn't "open" at all as I had to "glue" (used glossy accents) a ribbon to the inside of the back opening - because the card kept falling over due to the weight. But once the ribbon was there it stood up fantastically :-)
Copics: E41, E42, E43, E44, E47, E49, Y02, Y06, Y23, G03, G05, E31, E33, E27, YG11, YG13, YG25, YG67, YG23, YG17, BV00, BV02, BV04, B41, B45, B000, 0, B12, B14, and R27.
Stamps: Penny Black "Teddy & Company", Sizzix and Hero Arts stamp and die cut set #657778 and #657852, Whimsy Stamps (free with Issue 46 of Australian Simply Cards) and Imaginisce Snag 'em stamps "Cloud".
Ink: Memento Tuxedo Black, Versa Color #19 Cyan, Distress Ink "Walnut Stain", "Pumice Stone" and "Tea Dye".
Cardstock: DCWV Textured Neutrals, X-Press It Blending Card, Creativ Plain cardstock and Kaisercraft Fine and Sunny.
Dies: Spellbinders Nestabilities "A2 Matting Basics A" and "B", Sizzix and Hero Arts stamp and die cut set #657778 and #657852, Die-namics "Picket Fence", Cherry Lynn Designs "Tags 1", Spellbinders Shapeabilities "Flower Burst" and Spellbinders Shapeabilities "Foliage Two".
Other: Tim Holtz Distress Markers "Barn Door", "Mustard Seed", "Spiced Marmalade", "Shabby shutters" and "Peeled Paint", Stickles "Stardust", Inkssentials Glossy Accents, Scor-pal, Fiskars Rotary trimmer, Sizzix Bigshot, Scissors, double sided tape, X-Press it high tack foam mounting tape, Pebbles Pearlescent chalks and Milford Mercer "string".
The card was inspired by a picture I found on the internet but I cannot find the link in my bookmarks (I was sure I saved it but maybe I didn't??) All I can remember is that it had a big die cut tree that the person had cut twice, cut the leaves off the front tree, embossed it and then stuck them together. Not much to go on, I know... sorry... If I find it I will post the link here.
Congratulations
I would like to share a card that I made a few weeks ago for a friend. I love colouring this image (and all Popcorn the Bear images) :-)
And a close up of the flowers so you can see the AtYou Spica and Glossy Accents that I added:
Copics: E40, E41, E42, E43, E44, E47, E49, Y11, Y13, Y28, YR15, YR18, Y21, Y35, Y38, YG91, YG93, YG95, YG99, YR24, YR27, E37.
Stamps: Crafter's Companion Popcorn the Bear "Thanks a Bunch" and Stamp-It "Congratulations".
Ink: Memento Tuxedo Black
Cardstock: X-Press It blending card, DCWV Textured Brights, DCWV The Stardust Stack, Creativ Plain and Creativ card.
Dies: Cherry Lynn Designs "Eastern Star Doily"
Other: Ribbon (from my stash), Martha Stewart Corner Rounder, Spinkles 3mm "Sultana", Creativ metallic leaves, Pebbles Pearlescent chalks, Glossy Accents and AtYou Spica glitter pens.
Sunday, 23 June 2013
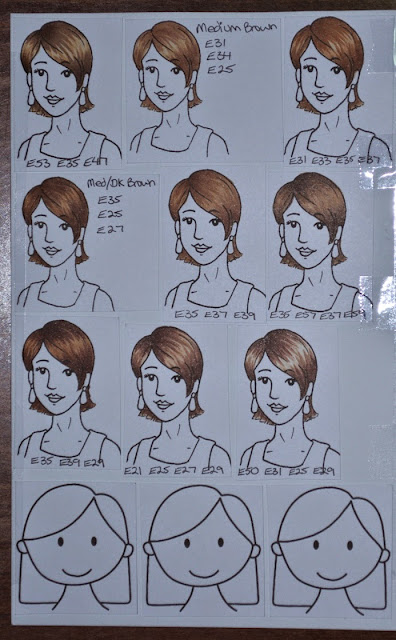
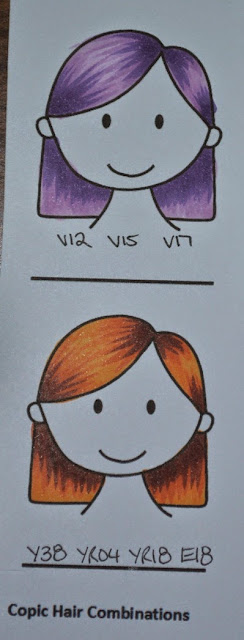
Copic Journal - Hair Colours
The Copic Oz website did a post on hair combinations a few weeks ago and while I didn't get to enter the challenge at the time, I have since worked on my copic hair colours for my Copic Journal. I used a combination of the free template that you can get from the Copic Oz website and the hair template that came with the book Copic Colouring Guide Level 3: People by Colleen Schaan and Marianne Walker.
This is what I have so far:
Thanks for viewing :-)
See more of my copic colour combinations and techniques:
Colour combinations
Skin Colours
Colourless Blender Techniques
More colour combinations
Copic combinations added to Journal in 2014
I have also started a Copic page - you can view it here.
This is what I have so far:
Thanks for viewing :-)
See more of my copic colour combinations and techniques:
Colour combinations
Skin Colours
Colourless Blender Techniques
More colour combinations
Copic combinations added to Journal in 2014
I have also started a Copic page - you can view it here.
Copic Journal - Colourless Blender
Had so much going on lately so haven't been able to get my copics out as much as I would've like to. Made it back to the Copic Oz website recently and read about the colourless blender. Decided to try some techniques out to add to my Copic Colour / Technique Journal. This is what I tried out (hope you can read my writing!)
These are some of the websites I got my inspiration from:
Copic Oz - colourless blender
Kathy Jones's post at Copic Oz
Kate Palmer's post at Copic Oz
Some of Marianne Walker's posts at I Like Markers
- More about the colourless blender
- Colourless blender makes Jeans
- Marker to marker blending
Kristy Dalman - Creating patterns with the colourless blender
Entering this post in the Copic Oz competition - Copic Technique Journal #4 Colourless Blender Swatches to win a free X-Press It blending journal.
See more of my copic colour combinations and techniques:
Colour combinations
Skin Colours
Hair Colours
More colour combinations
Copic combinations added to Journal in 2014
I have also started a Copic page - you can view it here.
Subscribe to:
Posts
(
Atom
)